
In this guide
Setting up GST in Zoho Books means telling the software who you are for tax purposes so that every invoice, bill and return carries the right numbers. You do this from Settings, then Taxes, where you enter your organisation GSTIN, pick your registration type (regular, composition or others) and confirm your home state. Once that is saved, Zoho Books maps CGST and SGST to local sales and IGST to inter-state sales on its own, applies the correct rate from the HSN or SAC code, and keeps the data ready for GSTR-1 and GSTR-3B. This guide walks through the full setup in plain steps, with a worked tax calculation at the end.
Does Zoho Books support GST for Indian businesses?
Yes. The India edition of Zoho Books is built around GST and is a registered GST Suvidha Provider (GSP), which means it can connect to the GST portal and file returns directly. When you create your organisation on the India domain and set the country to India and the currency to INR, the GST features appear automatically. If you are weighing it against other platforms, our comparison of Zoho Books vs Tally for Indian SMEs sets out where each one fits, and the broader Zoho Books Accounting service page covers day-to-day bookkeeping beyond tax.
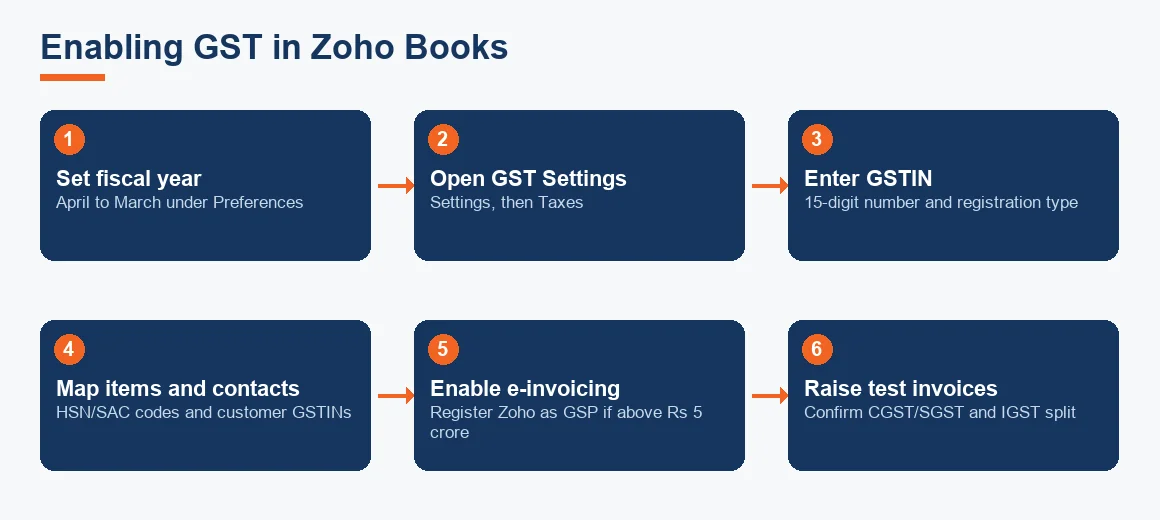
Before you touch a single tax setting, confirm your fiscal year is April to March under Settings, then Preferences, then General. GST return periods, opening balances and reports all key off this date, so it must be correct before you enter transactions.
How to enable GST in Zoho Books step by step
Enabling GST takes a few minutes once you have your GSTIN and registration certificate to hand. Work through these steps in order.
- Go to Settings, then Taxes, then GST Settings.
- Toggle Is your business registered for GST? to Yes.
- Enter your 15-digit GSTIN. Zoho validates the format and reads your state from the first two digits.
- Select your tax registration type: Regular for standard taxpayers, Composition for the composition scheme, or Special Economic Zone where relevant.
- Set the GST registered date so transactions before that date are treated as pre-registration.
- Choose whether you deal in reverse charge supplies and whether you have a digital services (OIDAR) obligation.
- Save. Zoho now shows GST fields on every invoice, bill, credit note and expense.
How to add CGST and SGST in Zoho Books
You rarely need to create CGST and SGST manually. Zoho Books ships with the standard GST rate slabs already built in, and it splits a single rate into its two halves based on the place of supply. When the customer is in your own state, an 18% rate posts as 9% CGST plus 9% SGST; when the customer is in another state, the same 18% posts as a single IGST line. The software decides this from the customer billing state against your registered state, which is why keeping accurate customer addresses matters.
Adding a custom tax rate
If you need a rate that is not pre-loaded, go to Settings, then Taxes, then Tax Rates, and select New Tax. Enter a name such as GST18, set the rate, and mark it as a tax group if you want CGST and SGST shown as separate lines on the invoice. For a full walk-through of how the underlying ledgers behave, a basic grasp of double-entry bookkeeping helps, because each tax line hits a separate general ledger account.
Setting up GSTIN mapping, HSN codes and place of supply
Three fields drive correct GST behaviour: the item HSN or SAC code, the customer GSTIN, and the place of supply on each transaction. Add the HSN code (for goods) or SAC code (for services) to every item under the item record so the rate applies automatically and the code flows into your returns. Record each customer's GSTIN on their contact so Zoho classifies them as registered (B2B) or unregistered (B2C). The place of supply defaults from the customer state but can be overridden on the invoice for cases such as ex-works delivery. Accurate GSTIN mapping is what lets the software decide CGST plus SGST versus IGST without you thinking about it.
Key terms
- Zoho GSTIN Mapping: linking each contact's GSTIN so supplies are classified as B2B or B2C and taxed correctly.
- GSTR-2B Input Tax Credit Matching: comparing your purchase records against the portal's auto-drafted GSTR-2B to claim eligible input credit.
- Journal Entry: the underlying debit and credit record Zoho posts behind every taxed invoice.
- General Ledger: the master account list where CGST, SGST, IGST and output tax balances accumulate.
How to enable e-invoicing in Zoho Books
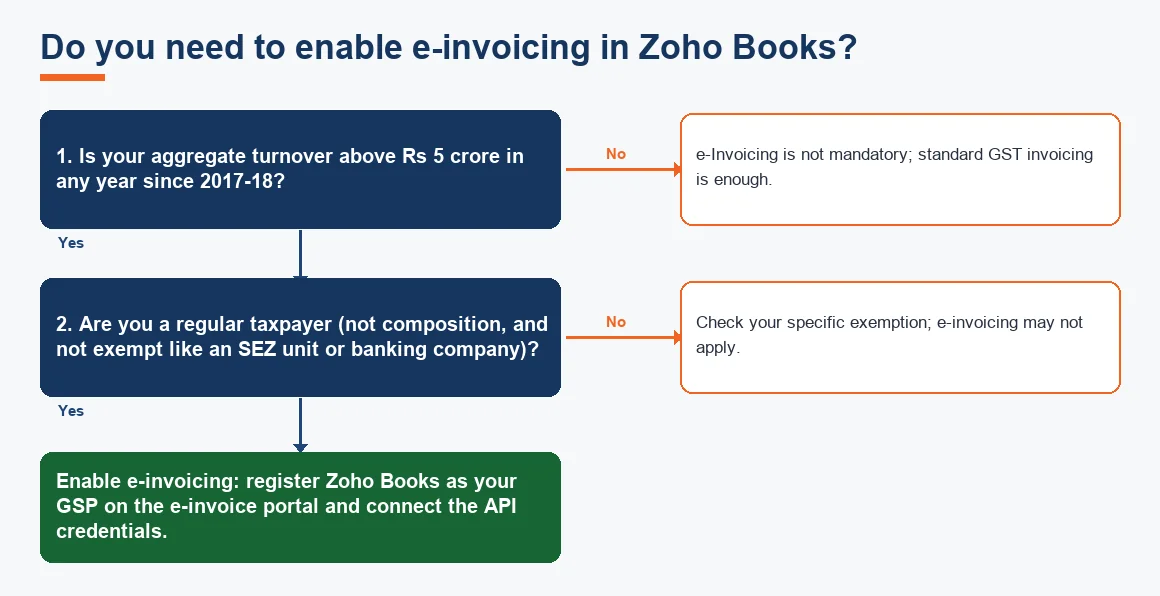
e-Invoicing is mandatory for taxpayers whose aggregate turnover crosses Rs 5 crore in any financial year from 2017-18 onward, per the current threshold notified by the CBIC. To switch it on, go to Settings, then Taxes, then e-Invoicing. You then register Zoho Books as your GST Suvidha Provider on the government e-invoice portal, create an API username and password there, and enter those credentials back in Zoho. From that point, approved invoices generate an Invoice Reference Number (IRN) and QR code automatically, and the details are reported to the GST portal in real time.
How to get GST reports and generate GSTR-1 in Zoho Books
Zoho Books keeps a dedicated GST section under Reports and a separate GST Filing workspace. To pull a return, go to GST Filing, select the return period, and Zoho compiles GSTR-1 (outward supplies) and GSTR-3B (summary) from the invoices already entered. You can review each section, spot invoices missing an HSN code or a customer GSTIN, and correct them before filing. Because Zoho is a registered GSP, you can push the return to the portal after OTP authentication, or export the JSON and upload it yourself. The mechanics of the full filing run are covered in our guide on how to file GST returns from Zoho Books, so we will not repeat them here.
For reconciliation, Zoho can pull back GSTR-2B from the portal so you can match your recorded purchases against what your suppliers have reported. This is the basis of your input tax credit claim and is worth doing every month rather than at year end.
How to record a GST payment in Zoho Books
After GSTR-3B computes your net liability, pay the challan on the portal, then record it in Zoho under GST Filing using Record Payment against the period. Enter the Challan Identification Number (CIN), the payment date and the bank account used. Zoho clears the GST payable ledgers so the balance nets to zero. Post any interest or late fee to a separate expense ledger rather than reducing the tax figure, otherwise your reconciliation with the portal will drift. If your bank feeds are connected, matching the payment is quicker; our note on automating bank reconciliation in Zoho Books explains that setup.
Worked example: CGST, SGST and IGST on one invoice
Consider a Maharashtra business raising an invoice for Rs 1,00,000 (Exl GST, indicative) at the 18% slab. The tax treatment depends purely on where the customer is. The table shows the same sale billed to a Maharashtra customer (intra-state) and to a Karnataka customer (inter-state).
| Line | Intra-state (customer in Maharashtra) | Inter-state (customer in Karnataka) |
|---|---|---|
| Taxable value | Rs 1,00,000 | Rs 1,00,000 |
| CGST @ 9% | Rs 9,000 | Nil |
| SGST @ 9% | Rs 9,000 | Nil |
| IGST @ 18% | Nil | Rs 18,000 |
| Invoice total | Rs 1,18,000 | Rs 1,18,000 |
The customer pays the same Rs 1,18,000 either way, but the tax splits differently and lands in different heads on your GSTR-1. Zoho makes this call automatically the moment you select the customer, which is why an accurate billing state on every contact is not optional.
Common setup checks before you go live
Run a quick review once GST is enabled: confirm the GSTIN and registered date, check that every item carries an HSN or SAC code, verify each customer's GSTIN and state, and raise one test invoice each for an intra-state and an inter-state customer to confirm the tax splits as expected. If you run more than one platform, the same discipline applies to Xero, Odoo and Tally Prime setups, though the exact menus differ. Businesses evaluating cost can review our breakdown of Zoho Books pricing and plans. For a wider check on which reporting standards apply to your entity, the Ind AS Applicability Checker is a useful starting point.
Key takeaways
- Enable GST from Settings, then Taxes, by entering your GSTIN and registration type before recording any transactions.
- Let Zoho split intra-state tax into CGST plus SGST and use IGST for inter-state; do not create a single flat rate.
- Add HSN or SAC codes to items and GSTINs to contacts so returns populate cleanly.
- e-Invoicing is mandatory above Rs 5 crore turnover and needs Zoho registered as your GSP on the e-invoice portal.
- Record GST payments against the period with the CIN, and keep interest and late fees in separate ledgers.
Setting up GST correctly at the start saves hours of correction at filing time. For hands-on help configuring or reviewing your Zoho Books tax setup, our Zoho Books Accounting team can take it from here.
Decision guide