

In this guide
Common TallyPrime shortcuts and data entry tips come down to a small set of keys that cut entry time (Alt+G to jump anywhere, F4 to F9 for the voucher types, Alt+2 to duplicate, Alt+C to create a master and Ctrl+A to save) plus a handful of habits that stop wrong postings before they reach the trial balance. This guide lists the shortcuts that matter in day-to-day bookkeeping and the checks that keep the data clean, so a team can post more in less time without quietly misstating the accounts. If you want the software set up and run for you rather than learned from scratch, that is a job for our Tally Prime Accounting Services; everything below is for accountants doing the entry themselves.
What are TallyPrime shortcut keys?
TallyPrime shortcut keys are keyboard combinations that open a voucher, a report or a master, or that accept and save the current screen, without reaching for the mouse. TallyPrime redesigned navigation around two of them. Alt+G opens Go To, which jumps straight to any report, voucher or master by typing part of its name from wherever you happen to be. Ctrl+G is Switch To, which changes the active screen instead of stacking a new one on top of it. Between them they replace most of the menu walking that Tally.ERP 9 users were trained on, which is the single biggest change to appreciate if you have moved across (our note on Tally Prime vs Tally ERP 9 covers the rest of what shifted).
The rest of the shortcuts fall into three groups: function keys that pick a voucher type, Alt combinations that act on the whole voucher or report (export, print, duplicate, delete), and Ctrl combinations that either save or open the second voucher in a family. Learn the group logic once and you rarely need a printed cheat sheet again.
TallyPrime function keys F1 to F12
The function keys are the backbone of data entry, and the use of F1 to F12 in Tally is worth committing to memory because they are the same on every accounting voucher screen.
- F1: Help, and on the Gateway it also handles company selection.
- F2: change the voucher date. Alt+F2 changes the period (the date range) of a report.
- F4: Contra. F5: Payment. F6: Receipt. F7: Journal.
- F8: Sales. F9: Purchase. These are the two you press most, and each has a Ctrl partner for its credit or debit note.
- F10: other vouchers (memorandum, reversing journal and the like).
- F11: company Features. F12: Configure, where you switch on options such as separate buyer and consignee details or additional narration lines.
The use of the F8 key in Tally is simply to open a Sales voucher, which is why F8 is usually the busiest key in a trading business.
Shortcut keys for data entry in TallyPrime
These are the shortcut keys for data entry in Tally that earn their keep across a full day of posting. Keep this list beside you for the first week and it will become muscle memory soon after.
| Task | Shortcut | Where it works |
|---|---|---|
| Go To (search anything) | Alt+G | Anywhere |
| Switch To (change screen) | Ctrl+G | Anywhere |
| Create a master on the fly | Alt+C | Inside a voucher field |
| Duplicate the current voucher | Alt+2 | Day book / voucher |
| Accept and save the screen | Ctrl+A | Vouchers, masters, config |
| Cancel a voucher | Alt+X | Voucher / day book |
| Delete a voucher or line | Alt+D | Voucher / day book |
| Credit Note | Ctrl+F8 | Voucher entry |
| Debit Note | Ctrl+F9 | Voucher entry |
| Export the current report or voucher | Alt+E | Any report / voucher |
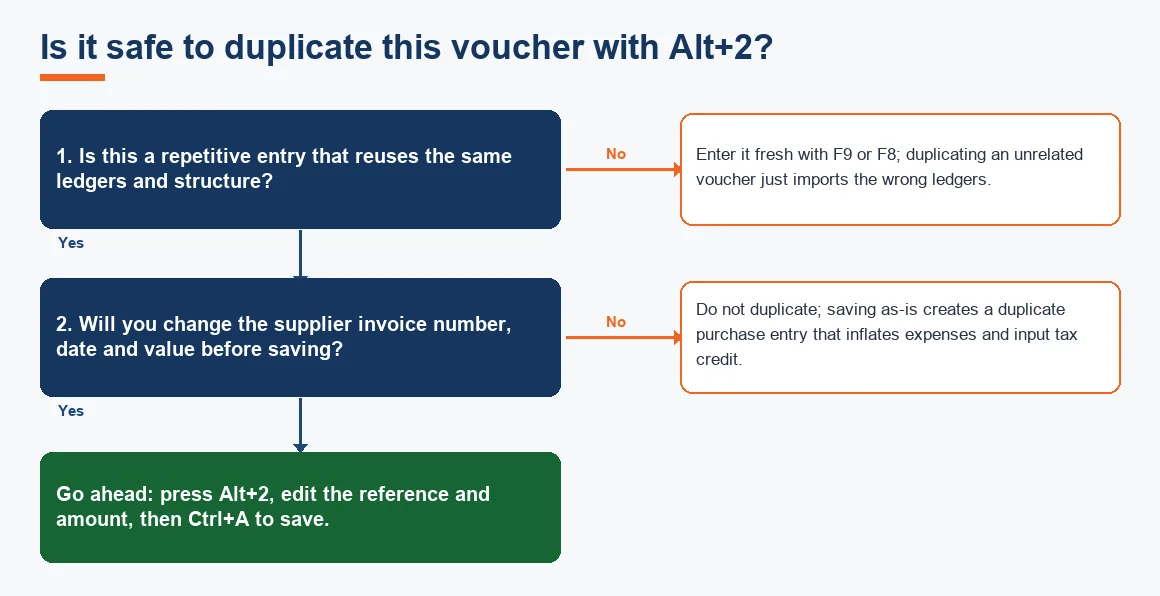
Two of these change how a team works. Alt+C creates a master, a new supplier ledger or a stock item, without leaving the entry screen, so entry does not stall while someone sets up the chart of accounts. Alt+2 opens a fresh voucher pre-filled with the same ledgers and amounts as the one you are looking at, which turns a repetitive purchase run into a few keystrokes. Each of these entries still resolves to a journal entry in the background and posts to the general ledger exactly as a manual entry would, so the discipline of correct grouping does not go away just because the entry is faster.
The 18 voucher types in TallyPrime
People ask what the 18 vouchers in Tally are because that is the count of predefined voucher types that ship with the software. They split into accounting, inventory and order categories.
- Accounting: Contra (F4), Payment (F5), Receipt (F6), Journal (F7), Sales (F8), Credit Note (Ctrl+F8), Purchase (F9) and Debit Note (Ctrl+F9).
- Order and delivery: Sales Order, Purchase Order, Receipt Note, Delivery Note, Rejections In and Rejections Out.
- Inventory and control: Stock Journal, Physical Stock, Memorandum and Reversing Journal.
That is eighteen. You can add your own voucher types on top (a separate series for cash sales, for example), but knowing which shortcut opens which predefined type is what makes entry quick. For GST work the Sales, Purchase, Credit Note and Debit Note vouchers feed the returns directly, which we walk through in the guide on filing GST returns using Tally Prime.
Alt+E, Ctrl+F8, Ctrl+F2 and the combinations people ask about
Alt+E in TallyPrime opens the Export screen for whatever report or voucher is on display, so a day book, a ledger or a GSTR summary can be pushed to Excel, PDF or XML in a couple of steps. It pairs with Alt+P (print) and Alt+M (e-mail). If you export ledgers to move data between companies or into another tool, that is the Tally XML export route.
Ctrl+F8 in TallyPrime is used to open a Credit Note, the voucher you raise when a customer returns goods or you issue a sales credit; its mirror, Ctrl+F9, opens the Debit Note for purchase returns.
The Ctrl+F2 shortcut is the one that causes confusion, because the key people actually want is usually Alt+F2. In TallyPrime, F2 changes the working date of the voucher and Alt+F2 changes the period (the date range) of a report, which is what most users mean when they talk about changing the range on screen. If a keystroke does not behave the way an old habit expects, check F2 and Alt+F2 first before assuming the shortcut is broken.
A fast, error-light entry workflow
Speed on its own is not the goal; a fast workflow that also lands the entry in the right place is. Here is a sequence that a team can standardise on for repetitive purchase entry.
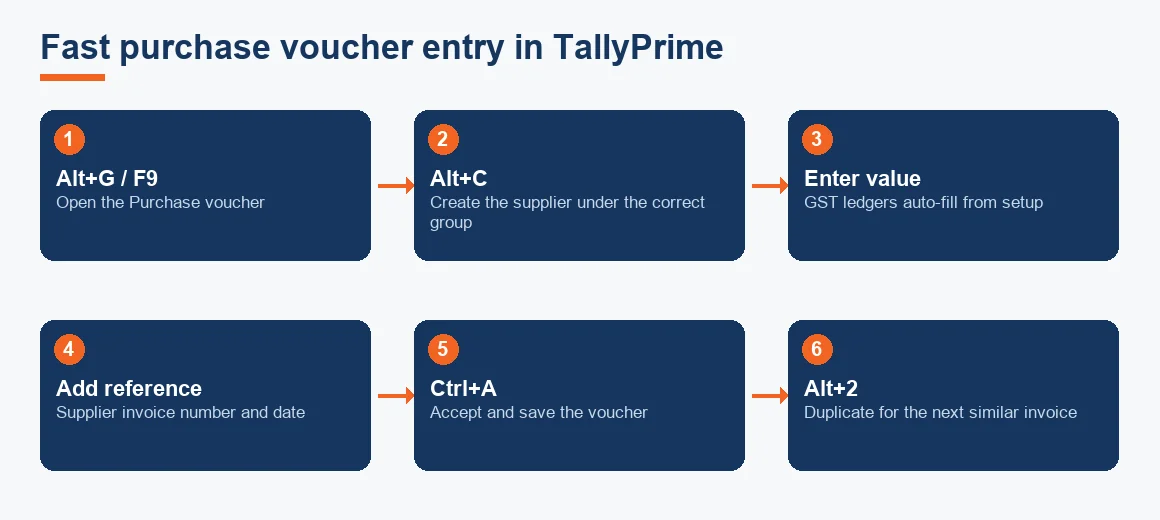
- Press Alt+G and type the voucher you want, or press F9 straight into a Purchase voucher.
- At the supplier field, if the ledger does not exist, press Alt+C and create it under the correct group.
- Enter the taxable value and let the GST ledgers pick up automatically from the stock item or ledger setup.
- Add the supplier invoice number and date in the reference field. Never skip this.
- Press Ctrl+A to accept and save without stepping through the remaining fields.
- For the next similar invoice, open it from the day book and press Alt+2 to duplicate, then repeat step 4.
Standardising this order matters more than raw typing speed, because it puts the reference edit (step 4) in the path every single time, which is exactly where duplicate and misdated entries creep in.
Data entry tips that prevent errors
The shortcuts save minutes; these habits save reconciliations. A clean set of books is easier to audit and turns into a reliable trial balance at period close, which is the whole point of double-entry bookkeeping in the first place.
Enforce narration and references
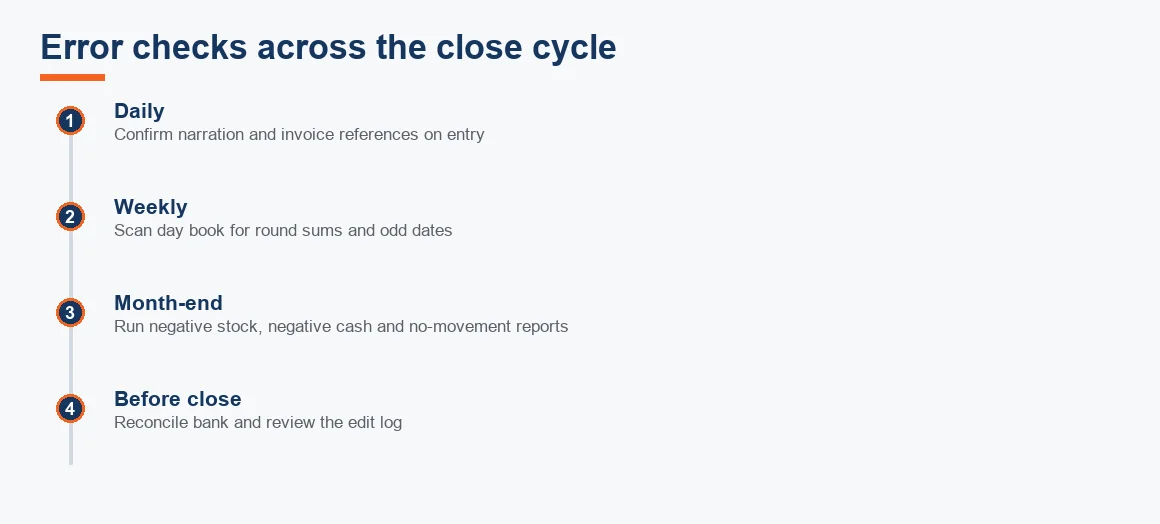
A blank narration or a missing invoice number is invisible on the day of entry and expensive at year end. Use F12 configuration to make narration compulsory on the vouchers that need it, and treat the supplier reference as mandatory on every purchase.
Run exception reports before you close
At month end, run the exception reports before closing: negative stock, negative cash, ledgers with no movement, and vouchers with blank narration. Then scan the day book for entries dated outside the period and for suspiciously round sum amounts. Reconcile the bank while you are there, because a clean bank reconciliation catches entries that never happened and payments posted twice.
Rely on the edit log
The edit log, mandatory for companies from 1 April 2023 under Rule 3(1) of the Companies (Accounts) Rules, records exactly what was altered after posting and by whom. It is now a statutory feature rather than an optional one, so treat it as your audit trail and do not switch it off; the requirement is set out by the Ministry of Corporate Affairs. Where GST vouchers feed e-invoicing or e-way bills, the same discipline applies, and the field rules published on the CBIC GST portal are the authority on what each document must carry (our walkthrough on generating e-way bills and e-invoices in Tally shows the entry side).
Worked example: recording a GST purchase voucher
Take an intra-state purchase of raw material worth ₹50,000 (indicative, Exl GST) at 18% GST, split as CGST 9% and SGST 9%. You would open the voucher with F9, create the supplier with Alt+C if needed, and save with Ctrl+A. The posting behind those keystrokes looks like this.
| Ledger | Dr / Cr | Amount (₹) |
|---|---|---|
| Purchase (raw material) | Dr | 50,000 |
| Input CGST @ 9% | Dr | 4,500 |
| Input SGST @ 9% | Dr | 4,500 |
| Supplier (sundry creditor) | Cr | 59,000 |
| Total | 59,000 = 59,000 |
The debits (50,000 + 4,500 + 4,500 = 59,000) equal the single credit to the supplier, so the voucher balances and the ₹9,000 of input tax sits ready to be matched against the return. If you duplicate this voucher with Alt+2 for the next invoice from the same supplier, change only the invoice number, date and value; the ledger structure carries over correctly.
Key terms
- Journal Entry: the debit-and-credit record that every Tally voucher resolves to behind the screen.
- General Ledger: the master record where all voucher postings accumulate by account.
- Trial Balance: the list of ledger balances that must agree, and where entry errors surface.
- Tally Vault: the password feature that encrypts a company's data so shortcuts do not become a security gap.
Key takeaways
- Alt+G (Go To) and Ctrl+G (Switch To) replace most menu navigation in TallyPrime; learn these two first.
- Voucher types live on F4 to F9, with Ctrl+F8 for Credit Note and Ctrl+F9 for Debit Note.
- Alt+2 (duplicate) and Alt+C (create master) are the biggest time savers, but only if you edit the reference and set the right group before saving.
- Ctrl+A saves any screen instantly; use it, but never let a stray Enter commit a half-finished entry.
- Run exception reports and keep the edit log on: clean data matters as much as fast data.
Once entry is under control in Tally, the same discipline transfers to other stacks if you migrate later, whether that is Zoho Books Accounting, Xero Accounting Services or Odoo Accounting Services; and if fixed assets are part of your postings, the depreciation calculator helps schedule the charge. Protect the data behind all of it by following our note on Tally data backup and security best practices.
Decision guide